Revit Rendering

Render the Revit view you already set up.

Export the 3D view and upload the image. You get a photoreal render designed to hold your geometry — and to keep the materials you already assigned. Not the .rvt file — there is no plugin or add-in to install.

No image handy? Try a sample
Free · no credit card · 3 previews · we don’t train on your uploads
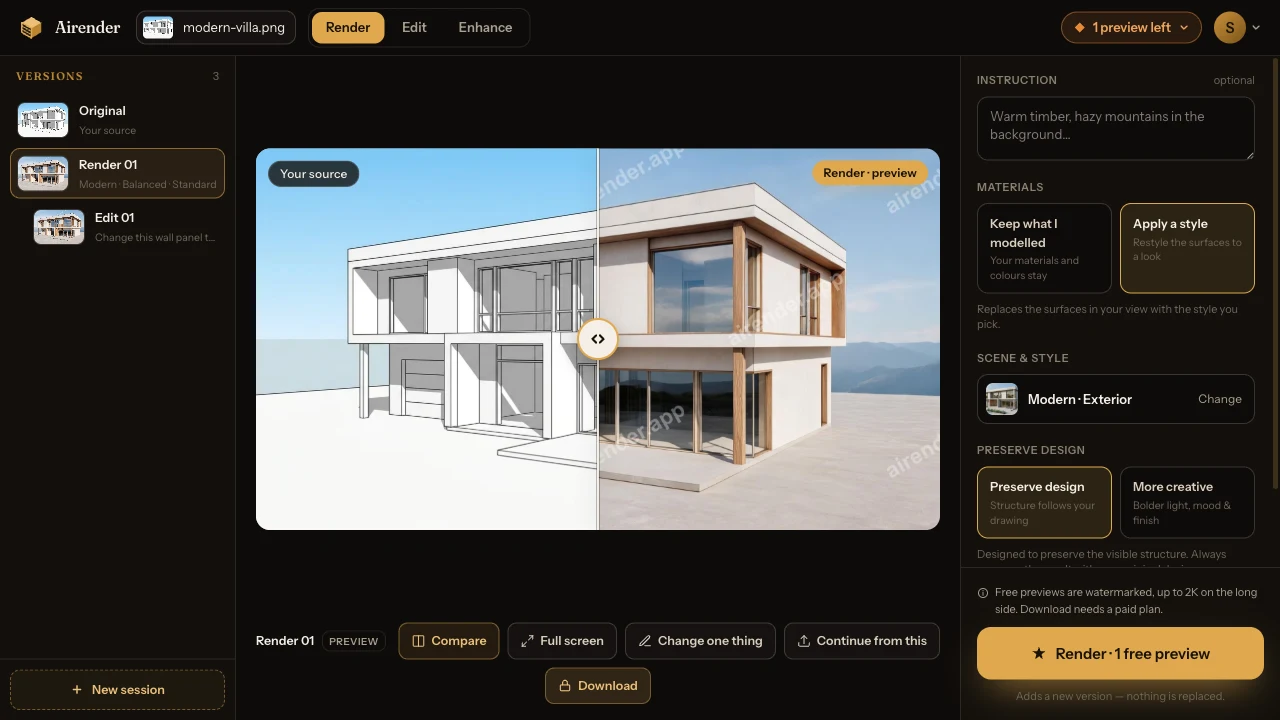
Designed to preserve your geometry — compare with your original
Example render — AI renderExample render — inputBeforeAfter
Example · drag to compare
Design fidelity

Decide up front how much licence the model gets.
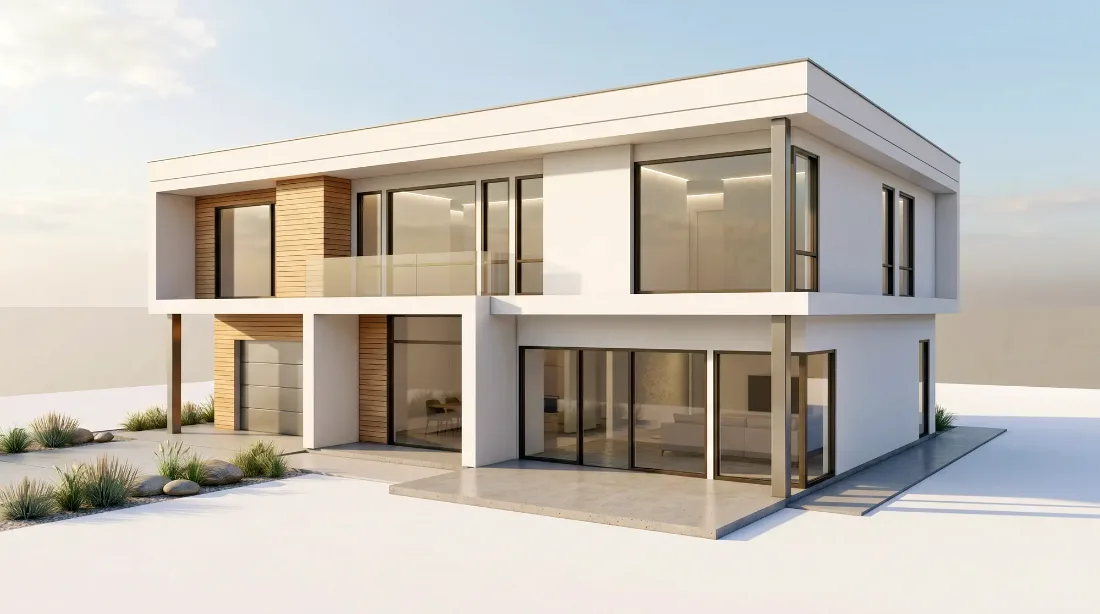
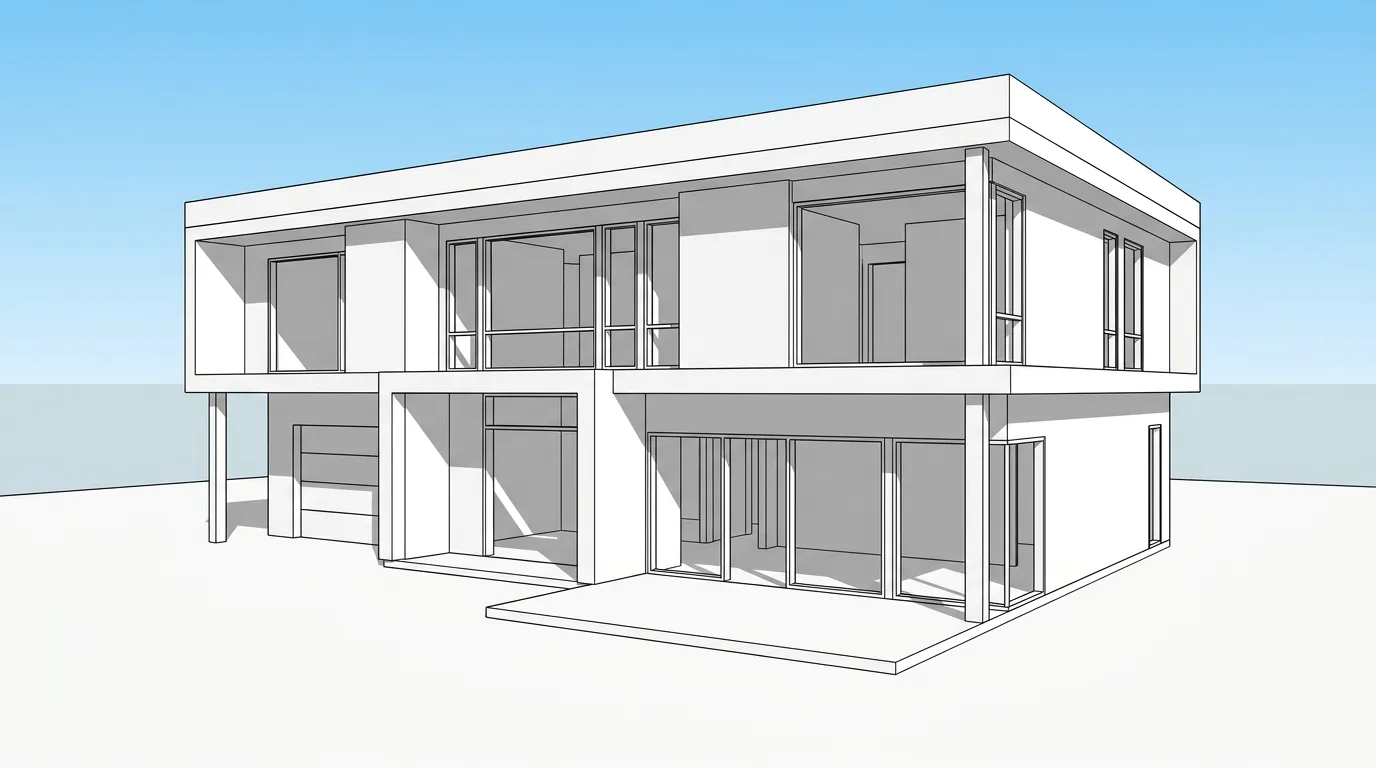
Every render runs at one of three fidelity settings, and the setting is what tells the model whether your massing, openings, roof lines and camera are allowed to move. These three are one source rendered at each setting — a model view rather than a Revit export, because this evidence is about the setting, not the application. The Revit case is the section under it.

The same model rendered at Balanced fidelity — AI renderThe same model rendered at Balanced fidelity — inputYour modelBalanced

Balanced asks for the same structure to be preserved while materials, lighting, context and realism are enhanced. The studio default.

Real output from the production pipeline — one example per setting, from the same source image. Generation is non-deterministic, so the same settings run again give a different image.

Balanced asks to keep
  • Massing and proportions
  • Window and door openings
  • Roof lines
  • Perspective and camera
And lets change
  • Materials and finishes
  • Lighting
  • Surrounding context
  • Photographic realism

In the studio this is one choice — Preserve design, which is Balanced above, or More creative, which is Creative. Faithful is the stricter setting and sits under Advanced, on the full Faithful → Creative slider.

Verified Revit example

A Revit export, rendered through the product you are about to use — and everything we checked on it.

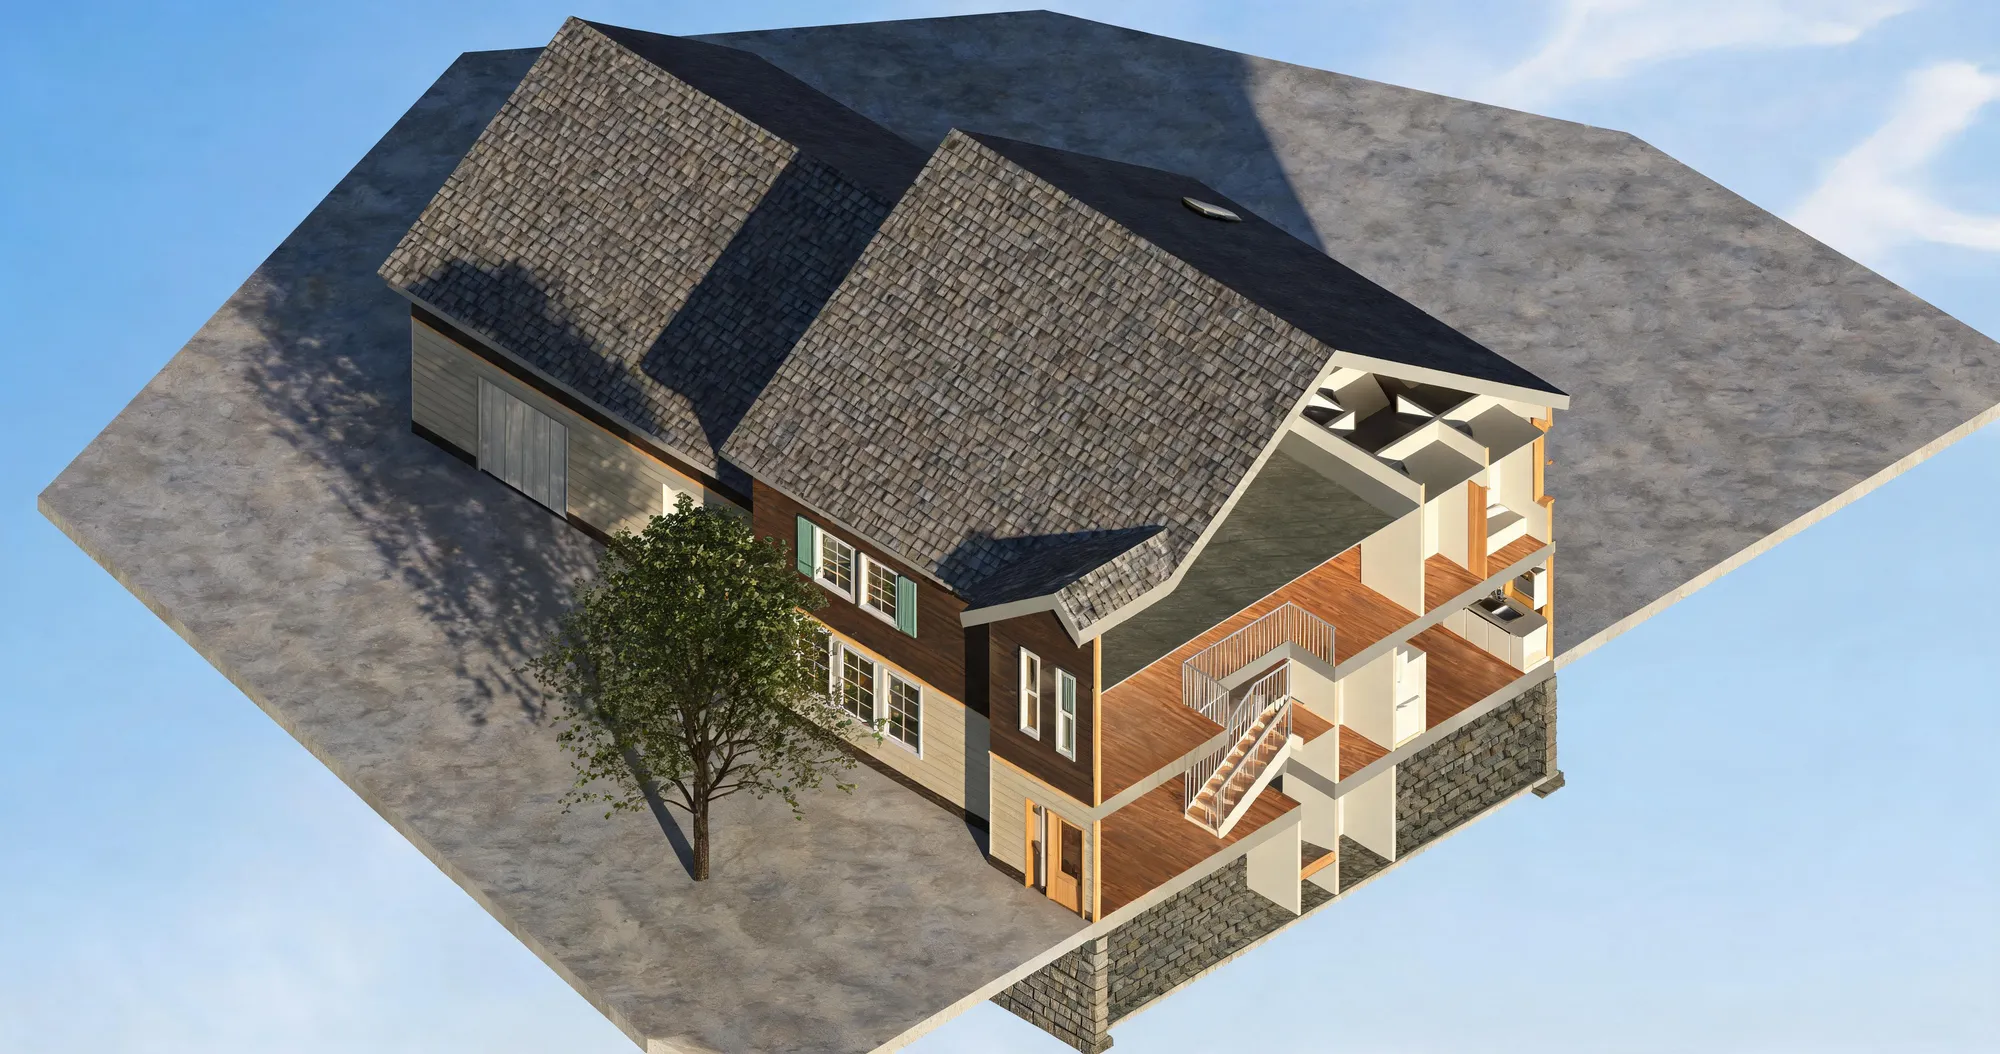
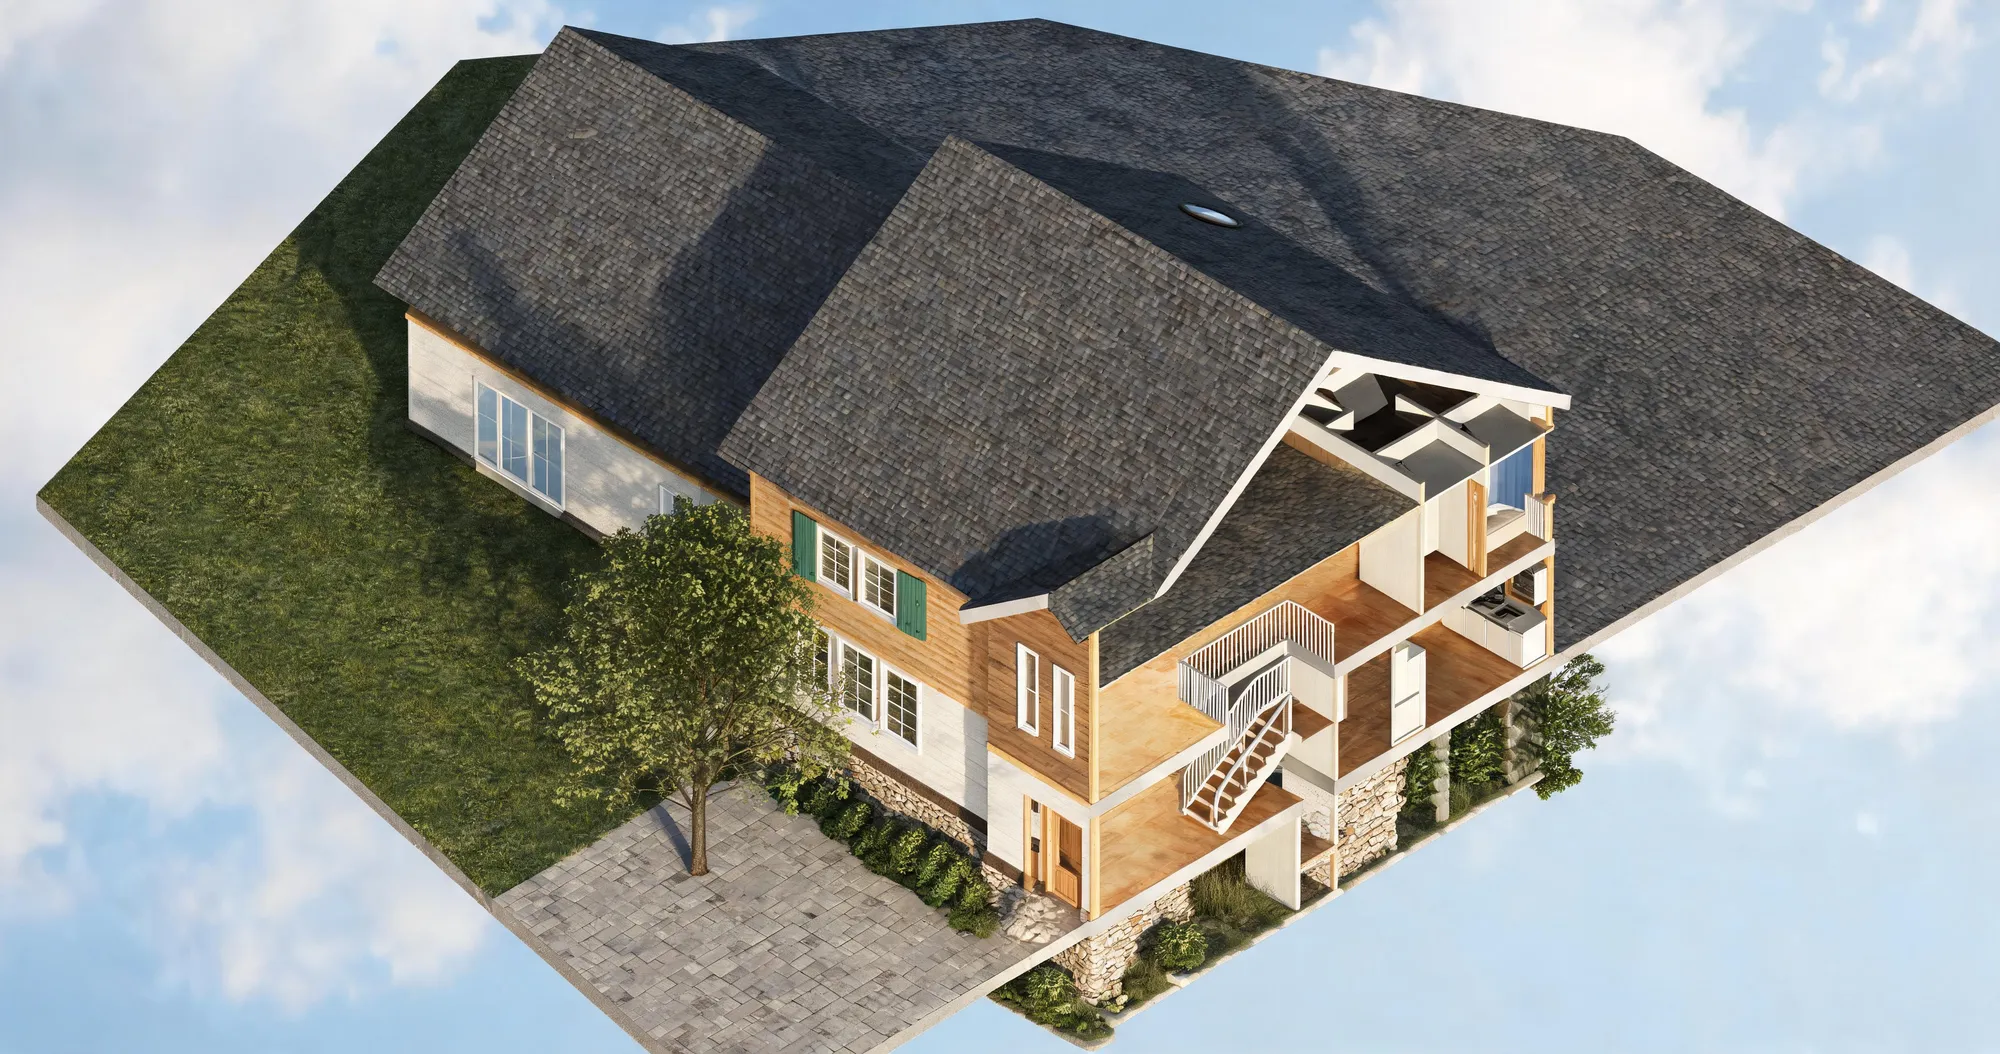
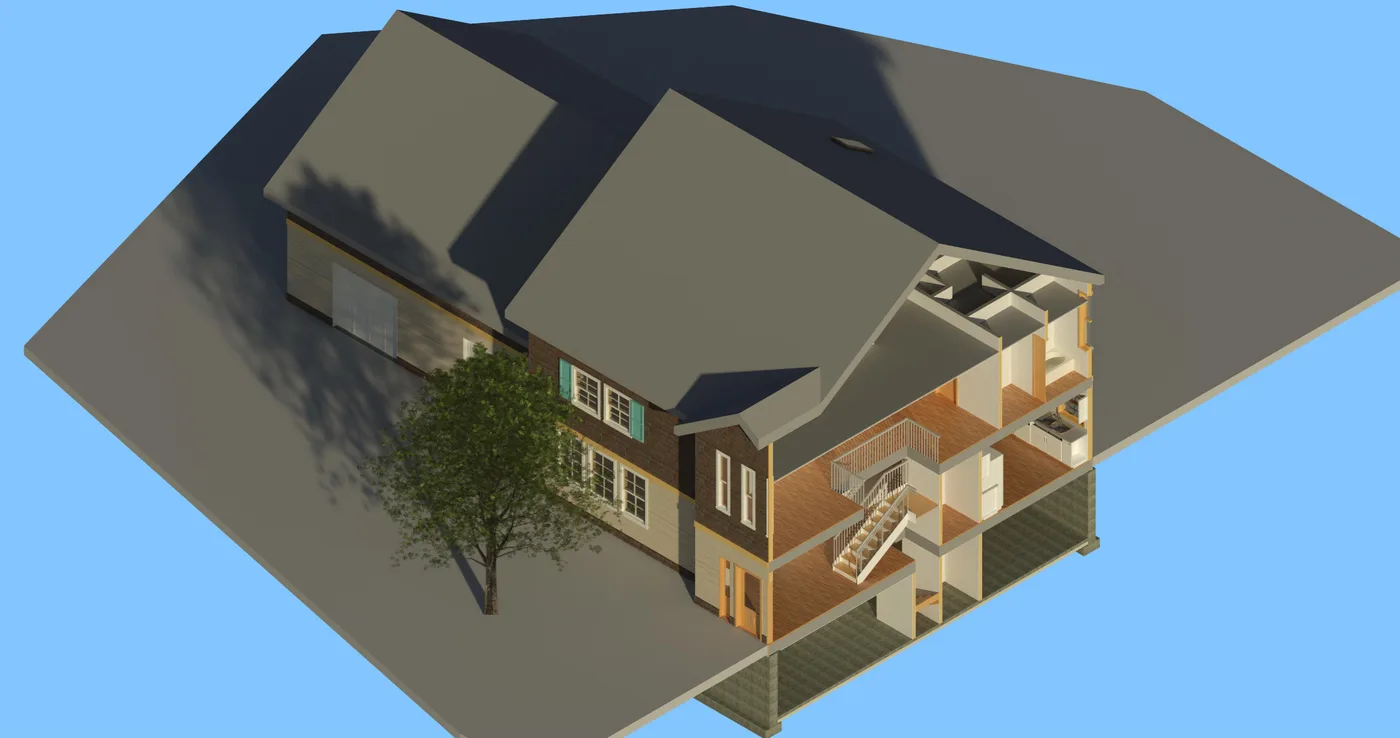
A shaded 3D view exported from Revit 2025, with a section box cut through it: repeated window openings, shutters, a roof with two valleys and a dormer, three floor slabs at the cut, and a stair with its balusters. Dense enough that you can count things. Drag the seam and count them.

A Revit 3D view with a section box, and the same view rendered by Airender — AI renderA Revit 3D view with a section box, and the same view rendered by Airender — inputRevit 3D viewAirender

Source view: Sinn0820 · CC BY 4.0 · Wikimedia Commons. Its file page describes it as a cutout of a building in Revit 2025, which is what lets us call it Revit. Scaled and re-encoded, never cropped.

Exterior · Keep what I modelled · Preserve design · HD

Held

  • Window count and positions, including the muntin grids and the pairs of shutters
  • Roof ridge, both valleys, the dormer and the eave line
  • The section cut, with three floor slabs at the same heights and thicknesses
  • The stair: run, landing, stringer and balusters, in the same place
  • Kitchen counter, upper cabinet and the wall openings around it
  • The tree, its position and the direction of its shadow
  • The camera, and the frame — output 1.8971 : 1 against a source of 1.8970 : 1

Changed, as asked

  • Roof and wall surfaces became real materials rather than flat shaded fills
  • Daylight, contact shadows and a sky replaced the viewport background
  • The site slab picked up a concrete texture

And what it got wrong

  • The brick on the upper wall came back as dark stained timber boarding — the two-tone split and the colour survived, the material did not
  • The cooktop and hood in the kitchen came back reading as a sink and tap

Neither moved a wall, an opening or the camera. Both are the render reading a surface differently from the way you assigned it — which is exactly why the compare slider is on before you send anything.

Materials

You already assigned the materials. Decide whether the render is allowed to.
The same Revit view, the same Preserve design setting, rendered twice — once asking the model to keep what was modelled, once asking it for a style. This is one control, and it is the difference between a render of your scheme and a render of someone else's.

Your Revit view
Your Revit view
Brick, boarding, shingle, shutters, wood floors — the materials already in the model.
Keep what I modelled
The same palette and the same two-tone split, made real. The default for a textured export.
Apply a style · Scandinavian
Same geometry, same camera, same section cut — the surfaces are deliberately replaced.

Note what the style version also did: it added lawn, planting and a paved path that are not in the model. Preserve design permits context to change — it holds the building, not the site. If that matters for the image you are about to send, keep the materials you modelled and add context with one sentence instead.

Controlled revision · verified pair

When the client asks for one change, you change one thing.
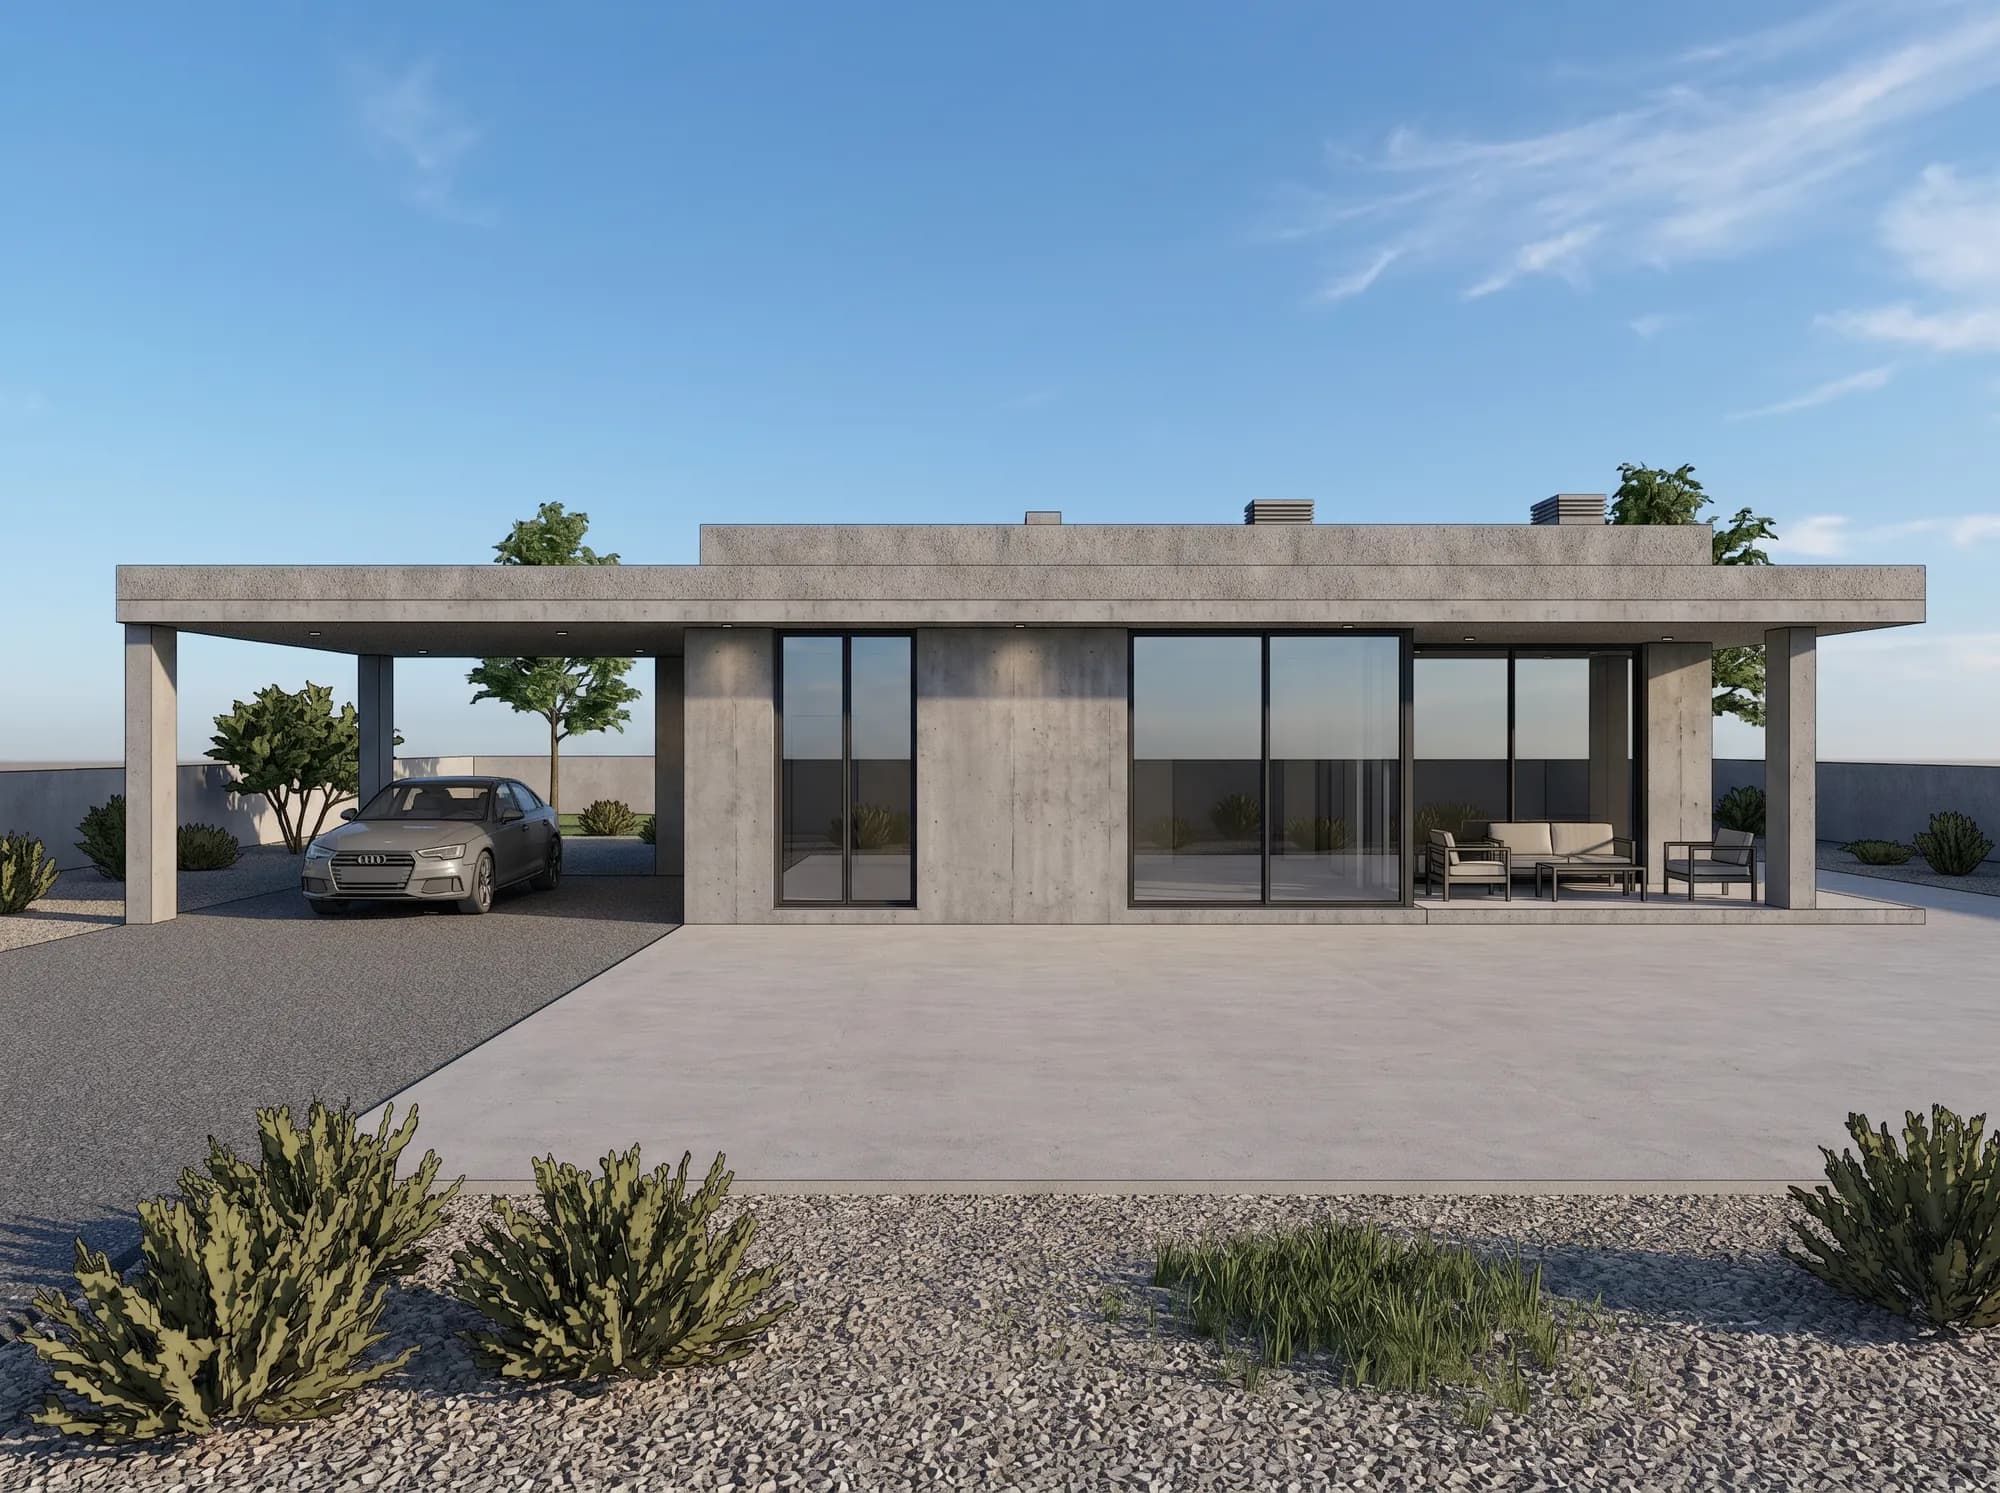
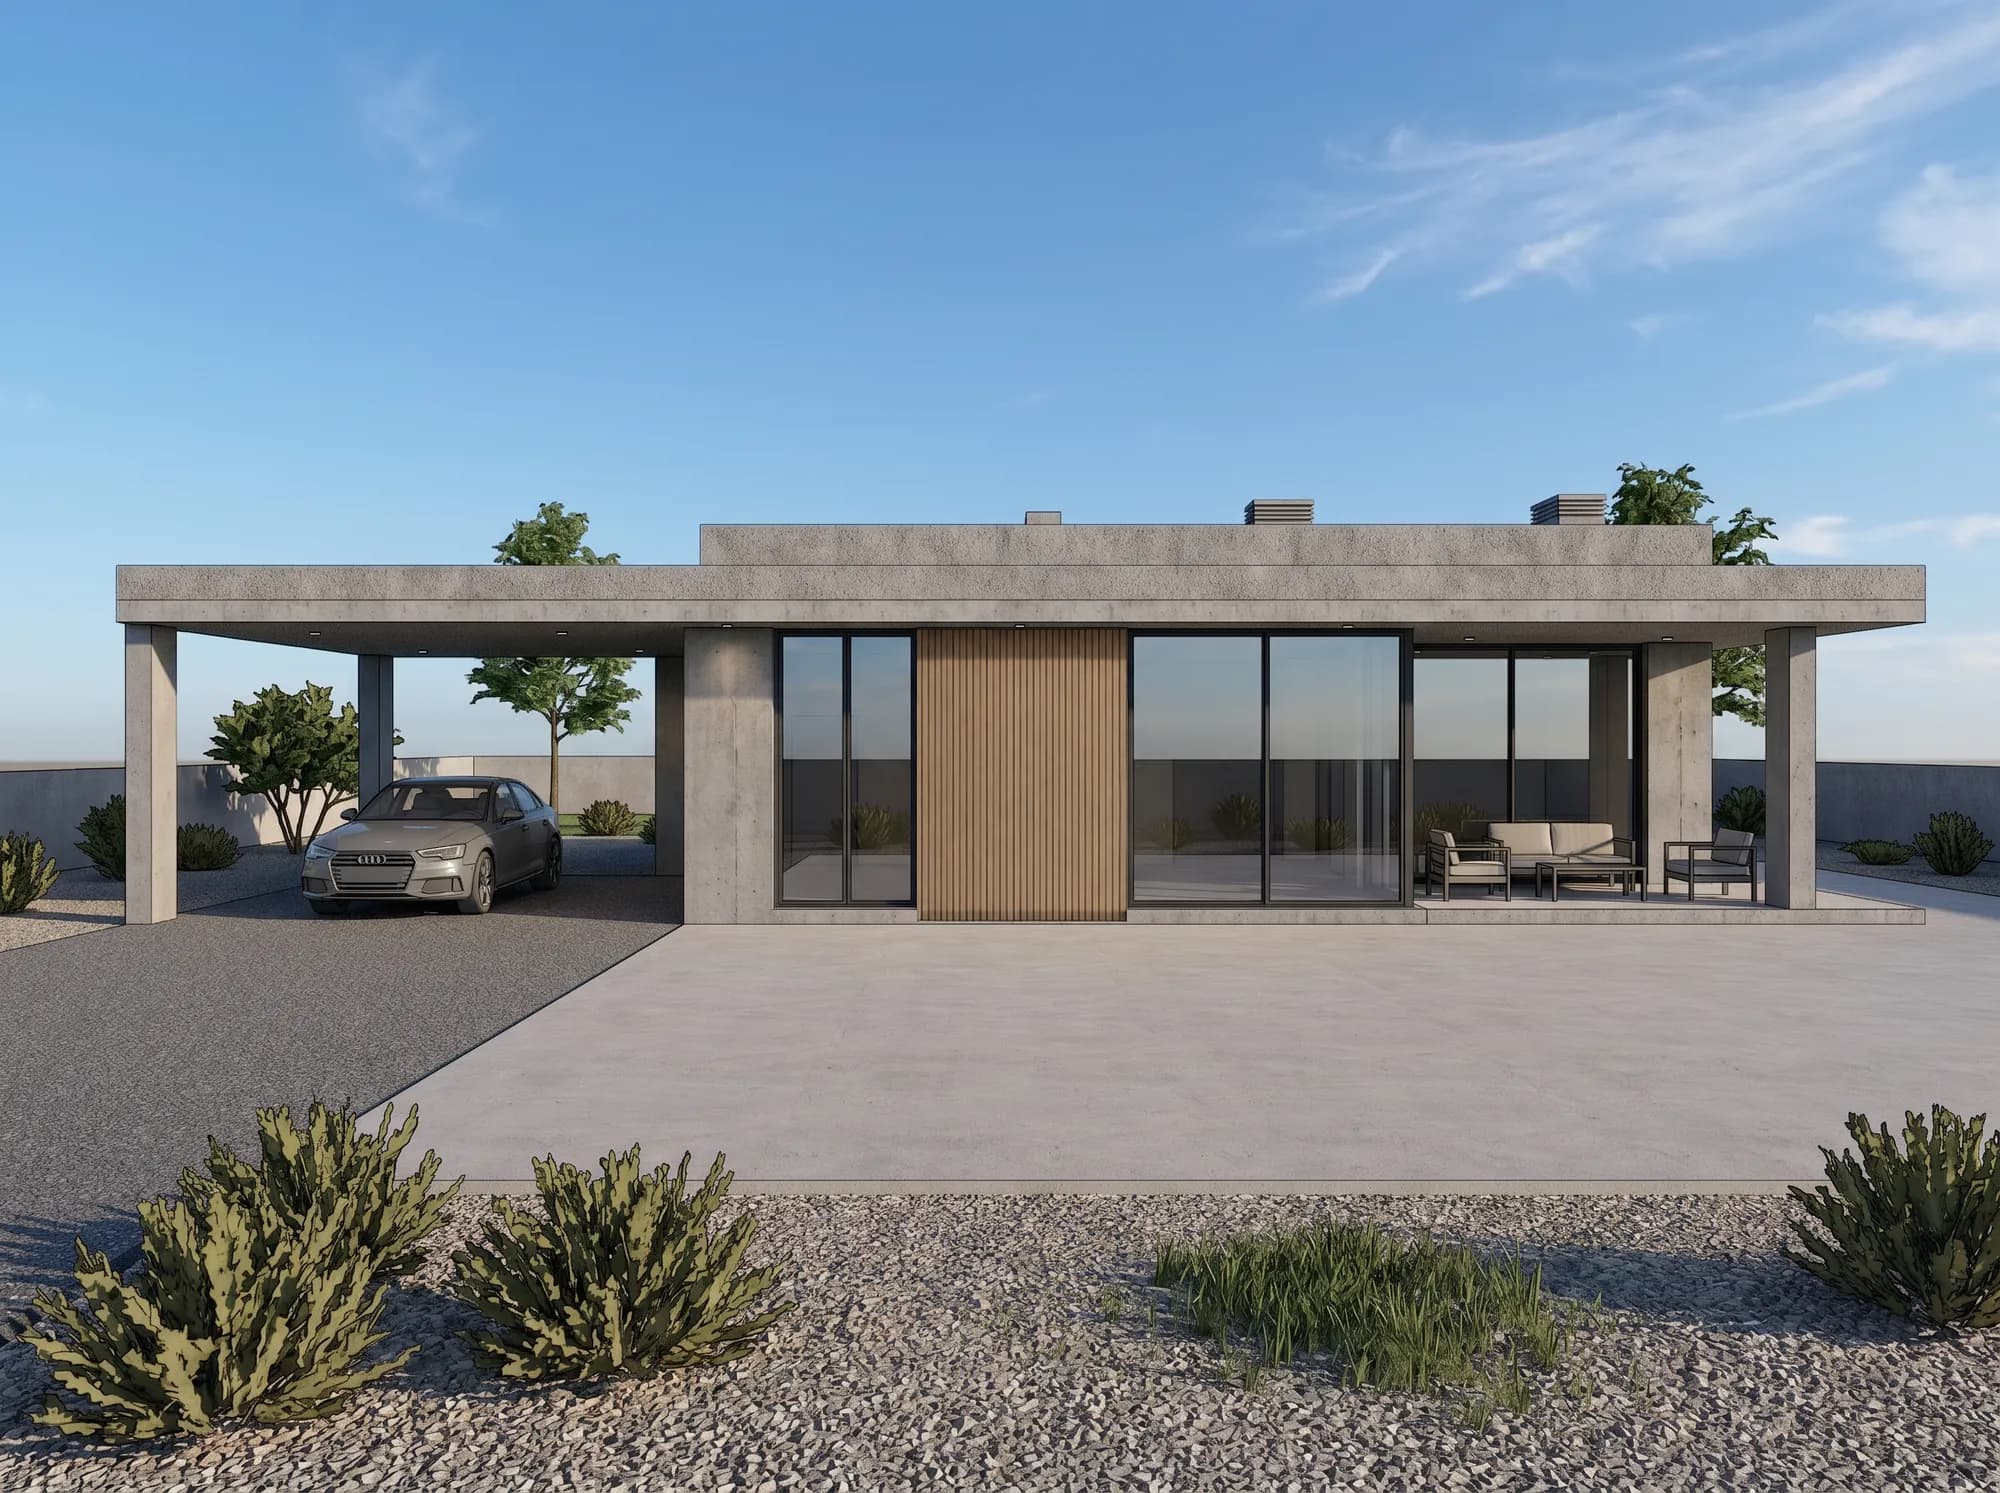
Everything outside your selection stays exactly as it was. For the most predictable result inside it, select a single surface — one wall, one panel, one roof plane — and keep windows, corners and structural edges out of the box. This selection sits on one concrete panel, edge to edge.

The parent render, with one blank concrete facade panel selected for a local edit
01Select one blank concrete panel and describe one change.
The same render after the edit: the selected concrete panel is now vertical timber cladding, and everything around it is unchanged
02Change this concrete panel to vertical timber cladding.
The parent render, with one blank concrete facade panel selected for a local edit
The same render after the edit: the selected concrete panel is now vertical timber cladding, and everything around it is unchanged

The same two files, enlarged. The window frames either side, the soffit reveal with its downlight above and the shadow line at the base all sit outside the selection — if the new panel had drifted, it would no longer line up with them.

Outside the selection: 0 / 2,924,260 pixels changed.Compared at full resolution, pixel by pixel

Which Revit view to export, if you want to revise it afterwards

The pair above is a near-frontal elevation, not a Revit export — and that is deliberate, because the selection is a rectangle and this is where a rectangle works. On a near-frontal view the facade edges are horizontal and vertical, so the box can sit on them and the change ends where the surface ends.

On an angled axonometric like the Revit case above, every surface runs diagonally, so no rectangle can bound one of them. We ran that edit anyway: outside the box, all 8,784,928 pixels were restored from the parent exactly, and inside it the new material stopped at the box rather than at the roof edge — a visible rectangle. Export a perspective camera view, which is the one you would send a client anyway, and this stops being a problem.

What is guaranteed is only ever the outside: the finalizer rebuilds every pixel beyond your selection from the version it came from. Inside the box, “change the material” is a sentence added to the instruction — it asks, it does not lock.

The workflow

Export, render, check, revise, version, export — in one session.
Everything made from one exported view stays together. Each run adds a version rather than replacing the last, so the image you showed the client on Tuesday is still there on Friday.

  1. 01

    Export the view

    In Revit, open the 3D or camera view you want and use File → Export → Image, or screenshot the viewport. JPG, PNG or WebP up to 10MB. Perspective views work best; a flat plan is not what this is for.

  2. 02

    Render it

    Say what the space is, whether to keep the materials you assigned, and how much licence the model gets. The result opens beside the original with the compare slider already on.

  3. 03

    Check it against your view

    Drag the seam and count the things you know: openings, mullions, roof lines, the camera. That check is the point of the compare being on by default.

  4. 04

    Change one thing

    Drag a box around the one area a client asked about, describe the change, and every pixel outside your selection is restored from the render it came from.

  5. 05

    Keep the versions

    Each run adds a version under the source it came from — Render 01, Edit 01 — labelled with the settings that produced it. Nothing overwrites anything.

  6. 06

    Export

    Download the full-resolution, watermark-free file on a paid plan, cleared for proposals and published work. Free previews stay in the Studio.

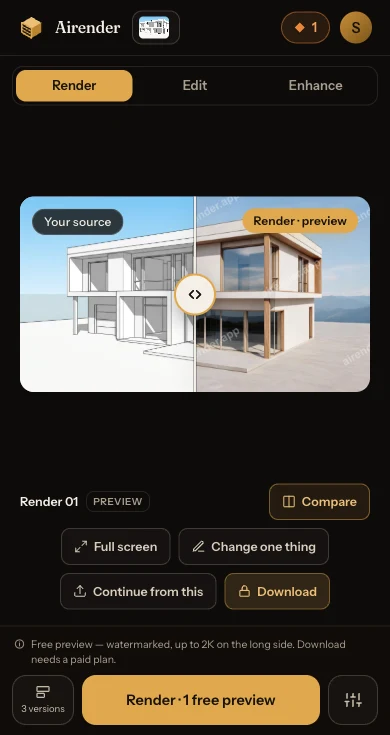
The Airender Studio on a phone: Render, Edit and Enhance tabs, the render on the canvas beside the view it came from, and a bottom bar with 3 versions, the render button and settings
The three panes: where the image came from, what you are looking at, and what you can do next. The rail on the left is the lineage, and every row is labelled with the settings that made it. This screenshot is a free account on a model view — not the Revit session above — but it is the same Studio you land in.
What you actually set

Four decisions, none of them about AI.

There is no sampler, no step count, no seed and no negative prompt. Each control below is described by what it asks the render to do — because that is all any of them are: instructions, not locks.

Whether the materials you assigned survive

Keep what I modelled asks the render to match the cladding, roofing, glazing and floor surfaces already in your view instead of substituting a palette. Apply a style does the opposite, deliberately. A view that arrives already textured — which most Revit exports are — opens on Keep, decided from the pixels, not from a question we made you answer.

How much the design may move

Preserve design asks for your massing, openings, roof lines, proportions and camera to be held while materials, light and context change. More creative asks only for the composition and silhouette to stay recognisable. A finer Faithful–Balanced–Creative slider sits under Advanced.

Light and camera — both default to Auto

Auto adds nothing to the prompt, which is the right default for a Revit view: you already set that camera in your own model, and we should not quietly assert a different one. Golden hour, overcast, midday or dusk are there when you want them, and they are descriptions written into the prompt — not a sun you are placing.

One optional sentence

A free-text instruction — “warm timber, hazy mountains behind” — applied where it does not fight the geometry. It starts empty and everything works without it.

How it compares

Three ways to finish a Revit view, by the job each one does.

Airender
This page
What it makes
A still image from one view, plus edited versions of it
What it works from
An image of the view — never the .rvt file, and no BIM data
Where it runs
A browser tab — nothing installed, rendering happens on our side
When the model changes
Export the view again and render it again — there is no live link
Revising one detail
Select the area, describe the change; pixels outside it are restored from the parent
Best for
Turning a view you already modelled into something you can send, and revising it in place
Enscape / D5
Real-time renderers
What it makes
A navigable real-time scene, stills and video
What it works from
Your live Revit model, through a plugin
Where it runs
Installed alongside Revit, rendering on your machine
When the model changes
The scene updates with the model
Revising one detail
Change the model or materials, then re-render the view
Best for
Walking a client through the scheme, and animation
V-Ray
Production renderer
What it makes
Art-directed stills and animation with real lights and materials, plus its own interactive mode
What it works from
Your live Revit model, through a plugin
Where it runs
Installed alongside Revit
When the model changes
Re-render from the updated model
Revising one detail
Change the model, materials or lights, then re-render
Best for
The one hero image that has to be art-directed

Nothing here says another tool is worse. The other two read your live model and this one does not — a real disadvantage, and also the reason it needs no install and no seat. The two right-hand columns were checked against chaos.com and d5render.com on 24 August 2026 and describe only what those pages state about themselves; check their current pages before making a purchase decision on them.

What it costs

Enough free to render your view and fix one thing on it.

Free — 3 previewsno credit card, granted the moment you sign in
  • Standard · 2K only — HD and Ultra need a paid plan
  • Output is watermarked, up to 2K on the long side
  • A render, edit, or enhance uses 1 generation. So one preview is deliberately left over for a retry
  • Previews are for judging, not delivering — Download and commercial use both start with a paid plan
Starter

200 generations / month

$24/mo

or $199 a year, billed annually

Pro

500 generations / month

$49/mo

or $429 a year, billed annually

Studio

1,200 generations / month

$99/mo

or $899 a year, billed annually

At the annual Studio rate that is $0.06 a generation — watermark-free and cleared for client work, at whichever quality you pick.

See full pricing →
Rights, privacy and getting out
We don’t train on your uploads

Your Revit views, prompts and renders are never used to train, fine-tune or improve any model.

You own both sides of it

You keep every right to the view you upload, and paid plans add a worldwide commercial licence for proposals, bids and published work.

Deleted when you ask

Ask us to remove your uploads and renders — or close the account — and they are gone within 30 days.

7-day money-back

Email us within 7 days of your first subscription payment and we refund it in full, no questions.

FAQ

What Revit users ask before they upload.

01Do I upload my .rvt file?

No — and there is no plugin, add-in or Autodesk App Store install. You upload an image of the view: File → Export → Image from Revit, or a screenshot of the viewport, as a JPG, PNG or WebP up to 10MB. That is also why the Revit version does not matter, and why a model on BIM 360 or ACC is no different — you are sending a picture of a view, not a model.

02Does it read my BIM data?

No, and it is worth being blunt about it: nothing on our side sees your families, parameters, phases, worksets, materials library or schedules. It sees the pixels of the view you exported. Everything this page says about openings and roof lines being held is about what is visible in that image — not about the model behind it.

03Will it keep my geometry?

That is what the Preserve design setting is for: it asks the model to hold your massing, window and door openings, roof lines, proportions and camera angle while materials, lighting and context change. Designed to preserve the visible structure. Always compare the result with your original design. That is also why the compare slider is on by default on the Studio canvas, and why the example above is draggable.

04My Revit view already has materials on it. Will it repaint them?

Only if you ask it to. Materials is a two-button choice above the render button, and a view that arrives already textured — which most Revit exports are — opens on “Keep what I modelled”, decided from the image rather than from a question. Choosing a style is the deliberate opposite, and the panel says so before you spend anything. In our own test the geometry held but one surface was reinterpreted: a brick wall came back as stained timber. Compare before you send it.

05Which view should I export?

A perspective camera view of the thing you want to show, framed the way you want the final image framed — the render keeps your camera, so it cannot recover what is outside the frame. Turn off the section box if you do not want it in the picture, and hide grids, levels and tags. Software UI, toolbars and cursors are explicitly ignored, so a raw screenshot is fine. A perspective view is also the one that lets you revise areas afterwards — see the note in the revision section above.

06What about Revit’s own cloud rendering?

Honest answer: we could not check it. On 24 August 2026 both autodesk.com and help.autodesk.com refused our automated requests, so rather than describe a product we could not open, here is only what follows from where each one sits. Anything Autodesk ships inside Revit renders from your model — your geometry, your materials, your lights — and that is a real advantage over working from an exported image. What it cannot do is take an image you already have and repaint one area of it without touching the rest. If you already pay for it and it gives you what you need, keep using it, and check Autodesk’s own pages rather than a summary of ours.

07Does this replace Enscape, D5 or V-Ray for Revit?

Not for what those are best at. Enscape and D5 give you a navigable real-time scene and animation off your live model; V-Ray gives you shot-by-shot art direction with real lights and materials. This does one thing they are slow at: turning a view you already have into a presentable still, and revising it in place. Most people who pay for it keep their renderer for the hero shots.

08What do I get free, and what does a render cost after that?

3 previews once you sign in, no card. They are watermarked, up to 2K on the long side at Standard · 2K only, and they stay in the Studio — Download and commercial use both start with a paid plan. That is deliberately enough to run one render and one edit on your own project before deciding. Paid plans are watermark-free at every tier and work out from $0.06 an image on the annual Studio plan. See full pricing →

09Can I use the renders in client work?

Yes, on a paid plan. Every paid plan includes a worldwide commercial licence to use your renders in proposals, presentations, competition boards and published work, and you keep every right to the view you uploaded. Read the terms →

Weighing up the alternatives first? Read how to render in Revit — or see AI architectural rendering across SketchUp, Rhino and interiors.

A Revit 3D view rendered with Airender

Export the view that is open in Revit right now, and see what comes back.

Render it, drag the seam against your own view, and decide from that.

Upload a Revit view — 3 free previews
3 free previews
No credit card
Commercial use on paid plans